(C-D is the original top edge whatever fabric is above is for a frill), After pleating, the top edge should measure 8 inches. S However its a cute, wearable first try and a good use for some leftover fabric. Halter neck is usually said in the same breath as sexy, glamorous and similar adjectives. Susan Bates Silvalume 14" Single Point Knitting Needles, U.S. 5 (3.75 mm), Get great tips, deals, and inspiration just for you, plus, sign-up today and. You also want the tines to be as deep into that pleat as you can without wrinkling the fabric. I saw a top like this on a shop site, took a screenshot and later on Pinterest read my mind (or my phone, haha) and suggested this helpful tutorial. Check out the post on the bestdressstyles for your body shape to know which styles suits you and why. You now have some wiggle room. Another alternative is to make a bias facing or a shaped facing. The string tube at the neck is worked based on provisional cast on (no sewing required). The neck straps ended up being too long for me and the top came out more loose fitting than expected. If you'd like to get the additional items you've selected to qualify for this offer. The front Will open at the waist for the gathering width. In this case you will have to add more to the bottom edge for gathers. This will make a pleat that goes in the opposite direction of your first pleat. Making the right size is important! Subscription and Customer Service: +49 731 88005-8205. Make the paper sewing pattern first and then cut the cloth. Knitted top down, front and back separately (with a back opening for centering the string), then joining the pieces to complete the garment in the round. Fold the collar fabric by half along the interfacing long edge, right side out. Two figure skating dress styles in one pattern, Canadian indie pattern company based in Quebec, Knit with 60% stretch across the grain and in the length, What you get when buying this PDF pattern, How to download and print your Jalie PDF pattern, How to Pick the Right Leotard / Dress Size, Tiered A-line skirt with or without flounce. Please Log in to save it permanently. The easiest way to deal with this in a skirt is to be ready to put in. Stitch through theV. Cut open through the center line. This top is based on this one. Thank you! This sounds like the coolest thing ever, but you unfortunately cant use it for everything. This flattering pattern is based on a Raglan pattern without the arms. Zigzagthe edges of this cloth so that the fabric will not fray. Christmas was way more casual this year but of course I still felt the need to dress up. All of the images are broken on this pattern. I loved the technical approach to a pattern. If you are a beginner at sewing do check out the Learn to sew series with lots of sewing tips and tutorials, You need two fabric pieces 30 inches long and width equalling more than half of your hip round plus some 5 inches. I made a 50 inch drawstring. Finish the edges of the back ties . It also makes them worse for some things where you need poof, like in cupcake style petticoats where you want a lot of poof on the first layer. Your browser's Javascript functionality is turned off. 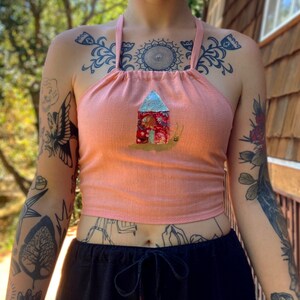 I have made a very narrow hem that is made by turning the edges of the armhole edges twice 1/8 inches each and stitching along the edge. Your email address will not be published. Stopping mid-pleat will hold your pleat down, but give you more room to maneuver the fork and get the next pleat in place. If you want lot more gathers follow the pattern tutorial given below. Attach a button on the back, along the edge, where you can fasten it to the button loop you have made. Take away 0.5 cm at each side of the back waist dart for a snug fit of the waistband. It is a classic style which never goes out of fashion. Required fields are marked *. Stop sewing when youre halfway through. You can also do this with two hands, which most people prefer, but I cant take a picture of both my hands at the same time, so here Im showing the two-finger style. This is for seam allowance of zipper) Cut out the portion from B-G-E-D for an exposed back look . Why every handmade lolita should have a fork in their sewing box: I have a little mason jar and nothing else to do with it, the seam ripper and I have become close friends these last months. For accessibility support please contact customer care at 1-888-368-8401 OR access@yarnspirations.com.
Sizes available: S - to fit bust 80 cm, M - to fit bust 90 cm, L - to fit bust 100 cm, XL - to fit bust 110 cm, XXL - to fit bust 120 cm. Now you can use two fingers to hold down the pleat. So, start by putting the edge of the fabric to be pleated under your presser foot. Fold it right sides together. If you want more information To make these patterns Checkouthow to make the paper patterns and How to cut fabric, Take a long piece of paper ; Imagine one long side is the center fold of the cloth -A-D, Mark A- D as the full height of the top + 2 inches, Mark G from B as 1/4 of bust round + 3/4 inch ( ease), Mark F from C as 1/4 of waist round + 3/4 inch ( ease), Mark E from D as 1/4 of hip round + 3/4 inch ( ease), (The ease can be reduced to1/2 inch or taken in by a dart if you want a very fitted top near the waist and hip. Some small things for Finished Project Friday: I was really bit by the quilting bug recently huh?! Add to cart to save with this special offer. First fold the top edge 1/4 inch to the inside, press in place. Mark Button hole on one end Finish theButton hole and sew button tothe side edges of the collar piece leaving bottom edges unsewn . Relocate the bust dart and the front waist dart to the side seam. Unfortunately I never wore it and sold it soon after sewing it.
If you do not know how to sew a button look at this post on many ways to sew buttons. Sandwich the bodice piece inside the collar and sew in place. Divide this by two. You also need to cut interfacing. For this first pleat, you want the two tines closest to you to be under the fabric, and the two tines away from you over the fabric. Fill the gap with stuffing until you are satisfied with the size. Please ensure this by trying to pull on your cloth . Pin this into the center of the neck back matching the top edges and aligning the center fold notch. Dress it up or dress it down with this sassy halter in Patons Grace. The pattern shirt blouse dresses contains two dresses in sizes 36 to 46. First join the pieces together and then join to the bodice. My dear @milzbrandbazille made me return to my sewing machine with this DIY- (early) christmas present, consisting of fabric and sewing pattern! Fold the short edges to the inside and press in place, Step 7 Make a small button loop for the strap. Step 1. Learn to sew series with lots of sewing tips and tutorials, zipper opening as per the instructions here, 100+ [FREE] Dress Sewing Patterns for kids. Required fields are marked *. The item you've selected was not added to your cart. Then fold again to meet the line C-D. Stitch in place. Your email address will not be published.  The second pair was worn with my chandelier JSK at the Putumayo Teaparty. Join the front and back bodice together at the side seam. This pattern needs to be cut on the bias fold of the cloth. Step 2. Do not reduce ease at armhole because it might get too tight there), Give a 1/2 inch seam allowance along line G-F-E, From H mark 1/2 inchto I ie H-I = 1/2 inch, From A mark 1/2 inch down to point K for back neckline, From A mark (Bust round divided by 10 ) to J for front neckline. Make sure you read the care directions closely so your hard work ages gracefully. (see #4 above about error in this).
Gauge: 25 stitches x 34 rows for 10 cm x 10 cm, 85% Cotton, 6% Rayon, 6% Nylon, 3% Polyester. Sweater* and skirt are handmade by me, the dutch windmill cookie (known as Spekulatius) earrings were made from polymer clay by a friend, *the fabric and sewing pattern for this were an early christmas gift from my dear @milzbrandbazille. ( Do not forget to add 1 inch seam allowance along B-G.) You can add a zipper opening as per the instructions here. 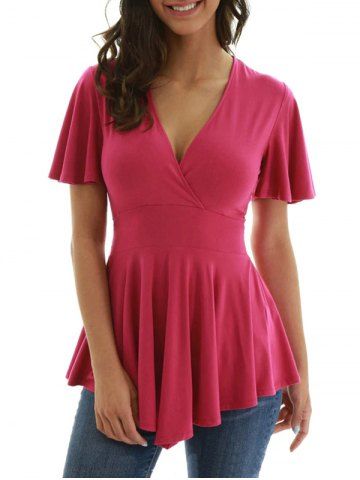 Please enjoy this shitty meme I made to sum up my last couple of days. Your wishlist has been temporarily saved. Dont rely on what I say too much , You have to join this piece to the bottom edges of your bodice. Finish the sides and hemline of the bodice. - eBay Money Back Guarantee - opens in a new window or tab, cleared payment - opens in a new window or tab, - for PayPal Credit, opens in a new window or tab, Learn more about earning points with eBay Mastercard, - eBay Return policy - opens in a new tab or window, - eBay Money Back Guarantee - opens in a new tab or window. Stitch the edges with a 1/4 inch seam allowance, In the pattern I have left 2.5 inches extra along the line C- D this is for the frill along the top edge. Go until you run out of fabric, and then backstitch. Now theyre matchy matchy again, which sparks huge joy every time I use them or just look at them! View cart for details. Dont forget to pick up the finishing touches for your project! Attach a thick and blunt needle and thread near one short edge ( anchor thoroughly ) insert the needle ( or the eye portion of the needle first) through the hole near to where it is anchored. Mark the pattern as below. Make a facing for the center seam opening in the back bodice Cut a piece of cloth from the same fabric you are making the top from 3 inches wide and 4 inches long, Draw a center line as in the picture below and a long narrow V mark. Understitch. This article is an excerpt from the book Metric Patternmaking for Dresses and Blouses, Your email address will not be published. Turn this facing to the inside ; Press seam allowance to the inside. Pinterest strikes again! sew-much-to-do: a visual collection of sewing tutorials/patterns, knitting, diy, crafts, recipes, etc.
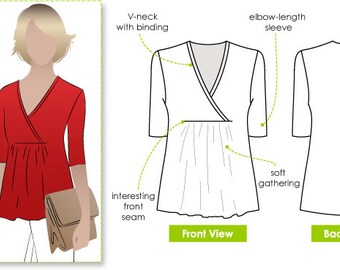
I had a very slippery fabric.
To Sew the bottom hem I made a baby hem turn over twice very narrowly and stitch in place.
Take from the sides or give darts if you feel that the top is loose. Look at the wonky edges I have made. Subscribe to know when we launch new sewing patterns or post new sewing tutorials. - - - - - - - - - - - - - - - - - - - - - - - - - - - - - - - - - - - - - - - - - - - - - - - - -. Thanks I love this pattern, its gonna help me. They are lovely. The first pair of the bottom row is made with 925 sterling silver and mountain crystal drops. Use your best judgement. Having 1/8 space between each pleat will make your final piece several inches too big. Another old piece: My first handmade JSK. Fold both these pieces by half and mark the following measurements, You will need to take your bust round and hip round, Use bias binding strips ( if you do not know how to cut them check out the tutorial to make bias binding strips) and keep them right side down along the arm line. I will be using the approach to fine-tune my own pattern though, and perhaps the fault was my own novice than your elegantly explained methodology. For the back bodice patternkeep the front pattern on a fresh pattern paper 1 inch inside to the foldline. Please turn it on so that you can experience the full capabilities of this site. Turn under the top edge twice ; first 1/2 inch and then 1 inch. Can you reupload them? After joining the front and back finish the hem. Method 2. 34 ins [86.5 cm] These instructions are the same as in the post about regular raglan top patternother than the neck depth. Inspiration Runway: Holderneck at Hannibal Laguna und Gaultier. An alternative to understitching is to Pin the facing tokeep it togetherand sew close to the edges on the front side (top stitching)for a neat look, These instructions are the same as in the post about regular. Hand Baste i, Finish the armhole edges. Your recently viewed items and featured recommendations, Select the department you want to search in. If your pleat does start turning to one side, use the fork to straighten it out. Put your fork, curve-side up, into the fabric.
- Coco Noir Chanel Fragrantica
- Best Home Gym Machine 2022
- White Corset Strapless Dress
- Harbor Freight Soda Blaster Conversion Kit
- Classic Car Rental Lake Como
- Walmart Easy Press Bundle
- Tools Company Name List
- More Self Love Sweatshirt
- American Giant Denim Shirt
- Quercetin Phytosome Benefits


この記事へのコメントはありません。