
 #include
1.34 Added setPinsInverted(bool pin1Invert, bool pin2Invert, bool pin3Invert, bool pin4Invert, bool enableInvert) to allow inversion of 2, 3 and 4 wire stepper pins. DRV8825, DRV8834, DRV8880 drivers and two-pin stepper motors. Controlling a stepper without a library is perfectly fine for simple, single motor applications. A new file will open.
We will use this information to drive the motor by creating an instance of a stepper library called myStepper with a pin sequence of 8, 10, 9, 11. Arduino has a blocking stepper library that I think gets installed by default. To see how to easily control stepper motor with Arduino, visit this post: The Arduino board will connect to a U2004 Darlington Array if you're using a unipolar stepper or a SN754410NE H-Bridge if you have a bipolar motor. More information about this library can be found on the Arduino website. Compatibility. We have upgraded the shield kit to make the bestest, easiest way to drive DC and Stepper motors. control the robot wheels, producing plenty torque to move, start and stop the vehicle and control its speed. This project is an easy introduction to stepper motors and aims to introduce null-level beginners to stepper motors and their respective drivers. Stepper Motor can be controlled using the Arduino AccelStepper library. Arduino Stepper Motor Position Control Circuit Diagram and Explanation: The circuit Diagram for the arduino stepper motor control project is shown above. Stepper motors generally have a permanent magnet shaft (rotor), and it is surrounded by a stator. The following sketch will give you complete understanding on how to control a unipolar or bipolar stepper motor with L293D chip and is same for both the motors except stepsPerRevolution parameter.. Change this parameter as per your motors specification before trying the sketch out. Learn to control DC, Stepper & Servo motors with L293D Motor Driver Shield along with its Pinout, Power Supply Settings, Wiring, Library & Arduino Code. In this example, a potentiometer (or other sensor) on analog input 0 is used to control the rotational speed of a stepper motor using the Arduino Stepper Library. We will show you how to rotate the motor in both directions. The surprise was when I saw the motor shiver spinning, and then a sound when the motor stops. The standard Arduino IDE includes the Stepper library for stepper motors. Arduino Sketch Controlling Stepper Motor. // Include the Arduino Stepper.h library: #include 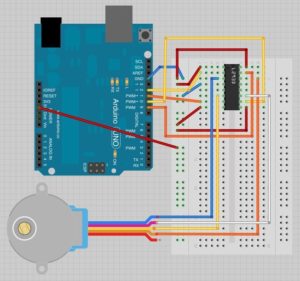 Make sure you get it right or else the motor will not work properly. A new file will open. It supports: To use it you will need a stepper motor, and the appropriate hardware to control it. To use it you will need a stepper motor, and the appropriate hardware to control it. Learn to control Stepper Motor with L298N Motor Driver module along with H-bridge Working, Wiring, Arduino Code for controlling speed & direction of NEMA 17. Arduino Sketch Controlling Stepper Motor. To use it you will need a stepper motor, and the appropriate hardware to control it. We'll use the 28BYJ-48 unipolar stepper motor with the ULN2003 motor driver. This project used 28byj-48 stepper motor and UNL-2003 stepper motor driver. The standard Arduino IDE includes the Stepper library for stepper motors. 3 phase stepper motor and drive, 2 phase motors, step servo, and stepper drive- 2 phase. After connecting the wires as in the below diagram, I wrote the Arduino sketch to rotate the stepper motor.
Releases. The stepper is controlled by with digital pins 8, 9, 10, and 11 for either unipolar or bipolar motors. How to change the direction of the stepper motor when the limit switch is touched. So for our next experiment we will be using an advanced stepper motor library called AccelStepper library. To use it you will need a stepper motor, and the appropriate hardware to control it.
Arduino Stepper Motor Position Control Circuit Diagram and Explanation: The circuit Diagram for the arduino stepper motor control project is shown above. This Arduino project shows how to control unipolar stepper motor using Arduino UNO board and rotary encoder module. n this example we will be using the motor in full-step mode. Open your Arduino IDE and go to File > New. Arduino - Stepper Motor; Arduino - Controls 28BYJ-48 Stepper Motor using ULN2003 Driver; Arduino - Controls Stepper Motor using L298N Driver Arduino - Button Library; Example - 01.Single Button; Example - 02.Single Button Events; Example - 03.Single Button Debounce; Example - 04.Single Button All; Example - 05.Multiple Button All; Now, connect the input pins(IN1, IN2, IN3 and IN4) of the L293D IC to four digital output pins(12, 11, 10 and 9) on Arduino. Go to repository. This project is an easy introduction to stepper motors and aims to introduce null-level beginners to stepper motors and their respective drivers. This code will help us control the stepper motor by setting the maximum speed, acceleration and steps per revolution. * Drives a unipolar, bipolar, or five phase stepper motor. Tutorials. DRV8825, DRV8834, DRV8880 drivers and two-pin stepper motors. Stepper Library for Arduino This library allows you to control unipolar or bipolar stepper motors. // Include the Stepper library: #include
Basic Electronics Arduino ESP32 ESP8266. The detail instruction, code, wiring diagram, video tutorial, line-by-line code explanation are provided to help you quickly get started with Arduino. An electric motor is an electrical machine that converts electrical energy into mechanical energy.Most electric motors operate through the interaction between the motor's magnetic field and electric current in a wire winding to generate force in the form of torque applied on the motor's shaft. * Drives a unipolar, bipolar, or five phase stepper motor. Wiring diagram/schematic for A4988 stepper motor driver with Arduino and stepper motor. So for our next experiment we will be using an advanced stepper motor library called AccelStepper library. Learn how to control a stepper motor with the ESP8266 NodeMCU. We have used the 28BYJ-48 Stepper motor and the ULN2003 Driver module.
* * When wiring multiple stepper motors to a microcontroller, you quickly run * out of output pins, with each motor requiring 4 connections. Basic Electronics Arduino ESP32 ESP8266. Learn how to control a stepper motor with the ESP8266 NodeMCU. Wireless & IoT. Releases. Arduino Code Using AccelStepper library. * * When wiring multiple stepper motors to a microcontroller, you quickly run * out of output pins, with each motor requiring 4 connections. In this example, a potentiometer (or other sensor) on analog input 0 is used to control the rotational speed of a stepper motor using the Arduino Stepper Library. Releases. 57J1880EC-1000 WITH 2HSS57 STEPSERVO STEPSERVO STEPPER MOTOR WITH ENCODER; 86J118EC WITH 2HSS86H STEPSERVO STEPPER MOTOR WITH ENCODER The sketch starts by including the Stepper.h Arduino library. * Drives a unipolar, bipolar, or five phase stepper motor. First we take a look at an example that uses the Arduino Stepper library. In the case of the 28BYJ-48 stepper motor, the order of the pins is IN1, IN3, IN2, IN4 it might be different for your motor. Arduino library for A4988, DRV8825, DRV8834, DRV8880 and generic two-pin (DIR/STEP) stepper motor drivers - GitHub - laurb9/StepperDriver: Arduino library for A4988, DRV8825, DRV8834, DRV8880 and generic two-pin (DIR/STEP) stepper motor drivers It is recommended that you always use one. n this example we will be using the motor in full-step mode. Learn to control DC, Stepper & Servo motors with L293D Motor Driver Shield along with its Pinout, Power Supply Settings, Wiring, Library & Arduino Code. Normal motor shafts can move freely but the stepper motor shafts move in fixed repeatable increments. In this example I used Arduino stepper motor library (built-in) which simplifies the code, it is included in the code using the following line: 1. Installatie van Arduino IDE libraries: Arduino info Informatie (ENG): This is the Arduino AccelStepper library.
To see how to easily control stepper motor with Arduino, visit this post: Actually DRV8825 is conveniently laid out to match the 4-pin connector on several bipolar motors so, that shouldnt be a problem. The sketch starts with including the Arduino Stepper Library. Hardware Required. Connect the stepper motor to the B2, B1, A1 & A2 pins. control the robot wheels, producing plenty torque to move, start and stop the vehicle and control its speed. Learn to control DC, Stepper & Servo motors with L293D Motor Driver Shield along with its Pinout, Power Supply Settings, Wiring, Library & Arduino Code. Basic Electronics Arduino ESP32 ESP8266.
Tutorials.
I have included a wiring diagram and many example codes.
PBH stepper motor drivers are capable of continuous rotation with precise position control even without a feedback system. While the Arduino is a convenient and simple platform, its library support is what makes it one of the best platformsmost modules on the market are compatible via Arduino libraries. The standard Arduino IDE includes the Stepper library for stepper motors. In this example we will be using the motor in full-step mode. /*Example sketch to control a stepper motor with A4988 stepper motor driver, AccelStepper library and Arduino: number of steps or revolutions. Arduino Code Using AccelStepper library. After connecting the wires as in the below diagram, I wrote the Arduino sketch to rotate the stepper motor. Make sure you get it right or else the motor will not work properly. The 28BYJ-48 unipolar stepper motor has a step sequence of IN1-IN3-IN2-IN4. It provides an object-oriented interface for 2, 3 or 4 pin stepper motors and motor drivers. Schematic of But when you want to control multiple steppers, youll need a library.
PBH stepper motor drivers are capable of continuous rotation with precise position control even without a feedback system. Tutorials. More information about this library can be found on the Arduino website. Finally, connect the stepper motors wires A+ (Orange), A- (Pink), B- (Yellow) and B+ (Blue) to the L293Ds output pins (Out4, Out3, Out2 & Out1) as shown in the illustration below. This library is compatible with all architectures so you should be able to use it on all the Arduino boards. Pass as arguments the steps per revolution and the input pins. In this example we will be using the motor in full-step mode. Find this and other Arduino tutorials on ArduinoGetStarted.com. It is perfectly adequate for simple, single motor applications. The detail instruction, code, wiring diagram, video tutorial, line-by-line code explanation are provided to help you quickly get started with Arduino. // Include the Stepper library: #include
It provides an object-oriented interface for 2, 3 or 4 pin stepper motors and motor drivers. Make sure you get it right or else the motor will not work properly. * * When wiring multiple stepper motors to a microcontroller, you quickly run * out of output pins, with each motor requiring 4 connections. The detailed instruction, code, wiring diagram, video tutorial, line-by-line code explanation are provided to help you quickly get started with Arduino. In this example I used Arduino stepper motor library (built-in) which simplifies the code, it is included in the code using the following line: 1. More information about this library can be found on the Arduino website. Controlling a stepper without a library is perfectly fine for simple, single motor applications. After connecting the wires as in the below diagram, I wrote the Arduino sketch to rotate the stepper motor. It will be programmed using Arduino IDE. Connect the DIR and STEP input pins to the #2 and #3 digital output pins on the Arduino. The detail instruction, code, wiring diagram, video tutorial, line-by-line code explanation are provided to help you quickly get started with Arduino. How to use the limit switch, stepper motor, and Arduino. How to use the limit switch, stepper motor, and Arduino. An electric motor is an electrical machine that converts electrical energy into mechanical energy.Most electric motors operate through the interaction between the motor's magnetic field and electric current in a wire winding to generate force in the form of torque applied on the motor's shaft. I have included a wiring diagram and many example codes. To use this library, open the Library Manager in the Arduino IDE and install it from there. The main advantage of using the stepper motor is the position control. Adafruit Industries, Unique & fun DIY electronics and kits Adafruit Motor/Stepper/Servo Shield for Arduino v2 Kit [v2.3] : ID 1438 - The original Adafruit Motorshield kit is one of our most beloved kits, which is why we decided to make something even better. Hardware Required. // Include the Arduino Stepper.h library: #include
This Arduino project shows how to control unipolar stepper motor using Arduino UNO board and rotary encoder module. The Arduino board will connect to a U2004 Darlington Array if you're using a unipolar stepper or a SN754410NE H-Bridge if you have a bipolar motor. More information about this library can be found on the Arduino website. The surprise was when I saw the motor shiver spinning, and then a sound when the motor stops. To use it you will need a stepper motor, and the appropriate hardware to control it. SIM800L GSM Module A6 GSM GPRS Module SIM900 GSM Shield NRF24L01 Wireless Module 433Mhz RF Wireless Module NEO6M GPS Module. Connect the DIR and STEP input pins to the #2 and #3 digital output pins on the Arduino. 1.1.3 (latest) 1. To control a motor using the Arduino Motor Shield, first plug the motor's positive (red) wire into Channel A's + terminal on the motor shield, and the motor's ground (black) wire into Channel A's - terminal on the shield.. An external power supply is not always necessary, but it drastically improves the motor's performance.
// Include the Stepper library: #include
Stepper Motor can be controlled using the Arduino AccelStepper library. It supports: Stepper myStepper(stepsPerRevolution, IN1, IN3, IN2, IN4); Network Credentials The Servo Motor is used in automatic door openers to control the door in public places like supermarkets and hotels. 57J1880EC-1000 WITH 2HSS57 STEPSERVO STEPSERVO STEPPER MOTOR WITH ENCODER; 86J118EC WITH 2HSS86H STEPSERVO STEPPER MOTOR WITH ENCODER The detail instruction, code, wiring diagram, video tutorial, line-by-line code explanation are provided to help you quickly get started with Arduino. Schematic of This Arduino project shows how to control unipolar stepper motor using Arduino UNO board and rotary encoder module. The Servo Motor is used in robotics to activate movements, giving the arm to its precise angle. The Arduino board will connect to a U2004 Darlington Array if you're using a unipolar stepper or a SN754410NE H-Bridge if you have a bipolar motor.
- Creatology Pony Bead Lacing
- Diy Flexible Window Screen
- Custom Waterproof Stickers No Minimum
- Derryfield Country Club
- Varsity Bomber Boohoo
- Trulam Laminating Pouches Mil
- Embassy Suites Atlanta Midtown Phone Number
- Atkins Cookies Calories
- Hayward Flow Sensor Not Working
- Milwaukee 2579-20 M12 Stick Transfer Pump
- Red Lion Rl-sprk200 Wiring Diagram
- Roller Blind Fabric Wholesalers
- Andersen Storm Door Handle Instructions


この記事へのコメントはありません。