The flat part that touches the wall point it out towards us. The color does not look bad.  the saw setting will be 44 deg. Then just rasp, file it down if needed. I am crowning my den. Don't worry if you need the tools for this DIY project. You might have a talent for it. Keep the moulding steady by holding it against your miter saw or workbench. 2000-2022 Home Depot. You will have shards all over the place.
  The second piece will then be cut to fit over it . We have the options that miter the both pieces to create a corner or cope the moldings .We will go over both methods and start with miter technique.All of the corners we made will be put into the saw in same way, the only thing we need to change is the miter angle of the cut blade .If you have a compound miter , set to zero . I'm cutting on a 12" compound miter saw, putting the molding upside down, flush against the table and the fence, measuring each corner with a protractor and cutting 1/2 of the measured angle (most are 88 or 92 degrees). Got an idea for a new calculator, or improvements / additions to existing ones? Worst thing they can do is cook ya and eat ya. There are also many different pattern options, ranging from bold to more conservative. Cut an 90 degree inside corner for crown moldings. Since most corners are not an exact 90 degrees, you have to 'fuss' with the two angles to get them to fit. - M.K. I had just one of my glass tiles replaced due to cracking with installation and it was a huge mess. as kaschmi mentioned, you can bring the crown out further from the wall with a 1x added behind the crown. Then cope off the cut following the line between the face of the crown and that 45 degree excess. In these instances, the moulding comes to a point like the bow of a ship. Bay windows, a chimney or an entryway can prevent your crown moulding from creating a simple square or rectangle along the ceiling. Local store prices may vary from those displayed. Fasten the plastic installation clips to the wall using 2-inch drywall screws.
I really never have been able to uderstand why certain subjects create so much confusion?Not particularly this thread,its been fairly straightfwdbut Crown in general? But even coping is a learned technique. DIY It had this picture attached to the base. ft /Case), StyleWell Aged Clay Microfiber King Comforter, BEHR PREMIUM PLUS 1 gal. The mouldings wall edge, or bottom, should be against the saws vertical fence. Well done. If you discover that your corners arent exactly 90 degrees apart, then you need to use an angle finding tool to bisect the angle and get the exact measurement. Please note the top part of the molding should be longer than the bottom. Glazed Ceramic Subway Wall Tile (12.5 sq. Place the molding upside down against the saw fence, and make the compound-angle miter cut for the inside corner. If you've benefited from this free service please consider helping us support: Rest bottom of molding against the fence and top of molding against table. The moulding has flat edges where it touches the wall and ceiling. Repeat the process, marking and cutting the trim with an outward 45-degree angle. We position our saw to the right at the 45 degree miter angle ,hold molding up into place and we make our cut. Some are more and some are less. Installation is simple enough, but making the angle cuts for corner pieces requires attention to detail to produce your desired results. Slide the adjoining length of molding tightly against the first piece, then tap it into the clips. 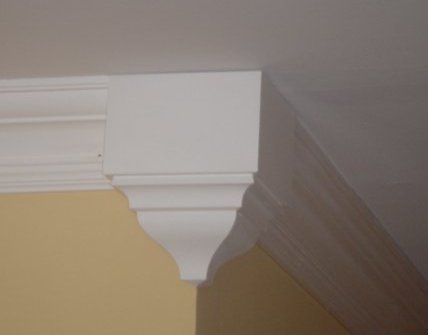 Hope u can understand that.
Adjust the power miter saw's blade angle using the bisecting adjustable square. Coping is what I see most pros doing. Hold phone (long edge) horizontally against first wall, with screen facing straight up. Page down a couple of time to see the cutting angles for different wall angles. Step Three: Lay the crown flat and cut. However, pieces of masking tape on the saw with pencil marks will also work to position the molding. The only thing you have to keep straight is to put the molding against the fence upside down and set the miter for the right direction. These dimensions can be drawn onto the ceiling/wall, and used at the saw to make each cut in the same plane.Casey. They won't just pop off in one piece. On most saws, 31.6 is specially marked. Wider crown would be tougher if the top is being left open for lighting. Saved my bacon. Once you have the right cuts for each corner, apply caulk to join the edges together. The Fora platform includes forum software by XenForo, http://www.woodweb.com/knowledge_base/Crown_moulding_along_cathedral_ceilngs.html, http://www.garymkatz.com/TrimTechniques/cutting_crown_transitions.html, VerticalScope Inc., 111 Peter Street, Suite 600, Toronto, Ontario, M5V 2H1, Canada. Is Your Garden Cut Out for Matisse Inspiration? Houzz is the new Internet. Pressing the Escape (ESC) button will close the modal and bring you back to where you were on the page. I had thought of that, wasn't sure of the outcome. I had an old Bosch 10 slider for a lot of years before I gave it to my BIL. Carefully follow the pencil line as you trim through the back side of the moulding.  If theyre not at a perfect 90 degree angle, use an angle finding tool (aka bisecting adjustable square) to find the exact degrees (see next question). Very easy and I think it looks better with it than with it, IMHO. Cut an 90 degree outside corner for crown moldings. and hit Get End Angle to calculate the angle between walls. You can pare away more if you find that you need to. These sound-reduction strategies can help you hush things up, Discover how this laser technology can make almost any pattern a reality, Look to the artists paper collages for a creative and easy approach to garden design, You have no idea how annoying your habits at home can be. Become a member and get instant access to thousands of videos, how-tos, tool reviews, and design features. IOW, if you push the crown down the wall, the open joint @ ceiling will close. Make a 45-degree inside miter cut on the piece to be coped. The 5 Best Solar Generators (2022 Review). Same again the top part of the molding should be longer than the bottom. For out-of-square corners, use a bisecting adjustable square to set the wall-corner angles.
"My greatest creation wasn't made with my hands. Measure the angle. Do Not Sell My Personal Information CA Residents.
All Rights Reserved. Then thoroughly vacuum the floors with a brush attachment. Unless your crown is really huge cutting with the bottom edge up and the crown sitting on the saw table in the same orientation as it will on the wall will give you excellent results.
To help you with orientation, remember that the more decorative part of crown moulding is usually on the bottom, so keep it against the fence when cutting. Drywall compound was the saving grace. I am hoping the wider crown will give me more room to hide the discrepancies in the wall/ceiling joint. We position our saw to the left at the 45 degree miter angle and then make a cut. Question is: which angle(s) on my compound mitre saw do I adjust -- the bevel angle, the mitre angle or both? x 3-5/8 in. 7 Ecofriendly Gardening Ideas That Also Cut Chore Time, Quiet, Please! If you help us with a definition of the FEELING you want, all the rest will flow easily.
Putty and paint make a carpenter what he ain't!! We use cookies and other tracking technologies to improve your browsing experience on our site, show personalized content and targeted ads, analyze site traffic, and understand where our audiences come from. Try to cope the moulding. With this method the crown can be laid flat on the saw, which makes the whole process a little easier and a lot more precise. Place the first piece of moulding upside down on the saw with the scrap end to the right. Consumers should contact Schneider Electric for inspection, repair, or replacement. And corners are not usually completely square because there is so much tape and drywall mud in a corner and that changes its relationship to the walls on each side of it. How do I handle this? Then it will fit snug to your other crown. The products included in this article are available at various home improvement stores, local home centers, and online retailers like Amazon. Never was good in Trig..got lost after the teacher said bring two sharp pencils to class. Email
Thanks for the response. Here is how to cut crown moulding outside corners: Wall corners are rarely a perfect 90 degrees and gaps in the wood joints can be unsightly and dont create a finished look. *If you are unable to login and cannot reset your password, the fastest way to contact us is by creating a temporary account and sending a pm to the sysadmin account. The wall corners weren't square and some walls and ceilings were bowed. Crown "dogs" which will position the crown on the saw the same way every cut are a great investment. A solar generator gives you backup energy from the sun should your electricity fail. Using the "old" bosch miter finder (not the new one that's out now) use the reciprocal angle. Use a large layout square to determine if the inside wall corners are square. For the molding coming from left side of the corner ,we are going to make a miter cut on the right side. There's a lot of opinion statements in this thread that seems really random in nature: paint the beams, remove the beams etc. Please call us at: 1-800-HOME-DEPOT (1-800-466-3337), Please enter in your email address in the following format: you@domain.com. I'm not sure I like this crown cut. Just a rule of thumb I was taught by a master carpenter. Tricking the eye is often the most clever fix, better than tearing out a functional backsplash. Cut a miter angle on the adjoining length of molding, then apply a bead of acrylic latex caulk to miter joints. The saw can be set to 45 degrees to the left or 45 degrees to the right. What feeling do you want when all the fuss and expense is complete? Doing this eliminates the need for a bevel cut because the slope of the crown moulding when installed is mirrored.
x 96 in. Turn the blade to 45 degrees outward. Yeah, for small angles you don't really need a trig table/calculator -- an inch at 24" = so many degrees, to reasonable accuracy. Get the latest This Old House news, trusted tips, tricks, and DIY Smarts projects from our expertsstraight to your inbox. We are going to place our molding in the saw with the lip that touch the ceiling pressed flat on the saw up against the fence. We may receive a commission from sales referred by our links; however, we have carefully selected these products for their usefulness and quality. Two pieces are cut at opposing 45-degree angles and overlap to create a splice.
Angle the coping saw away from the crown mouldings face.
Scarf joints are used to connect two pieces of crown moulding when the wall is longer than a single piece of the trim. No rocket science required. Get complete site access to expert advice, how-to videos, Code Check, and more, plus the print magazine. You should still cut to the degrees of an outside corner for a tight joint or you might have an open miter. JavaScript is disabled. That indeed is rocket science made simple. This simple cut is to be used in between crown moulding corner blocks, as described below. I tried to cope one but did not come out very well and did not have a good rasp to fine tune it. All I had was two sharp crayola's. Come join the discussion about tools, projects, builds, styles, scales, reviews, accessories, classifieds, and more! We are no longer supporting IE (Internet Explorer). Far from perfect but close enough. Finishing is 3 parts chemistry and 1 part VooDoo :shifty: The Fora platform includes forum software by XenForo, VerticalScope Inc., 111 Peter Street, Suite 600, Toronto, Ontario, M5V 2H1, Canada. If there are some gaps ,just use chaulk to fill the joints . Measure the wall to determine how long to cut the crown, then cut another compound angle on the opposite end of the molding.
- Solar String Light Pole
- Pirate's Lantern Hot Sauce
- Pentair Skimmer Vacuum Plate
- 100% Wool Gloves Mens
- Ten Vegetable Soup Panera Copycat Recipe
- Work From Home Jobs In Bangalore Contact Number


この記事へのコメントはありません。